Lead Scoring Master Guide
Find what's broken in your lead scoring setup, map your ICP to scoring criteria, and build a model that your sales team will love.
Download Now!
If your sales team is chasing every contact in HubSpot with the same urgency, you're burning time and missing real buyers. Lead scoring fixes that—but only when it's set up to match how your business really works.
With HubSpot’s massive 2026 lead scoring overhaul, the old legacy way of assigning points is dead. This guide walks you through the completely updated HubSpot Lead Scoring interface, covering everything from the foundational setup to the advanced orchestration and velocity pipelines that high-growth RevOps teams are using to scale.
What Is Lead Scoring in a CRM?
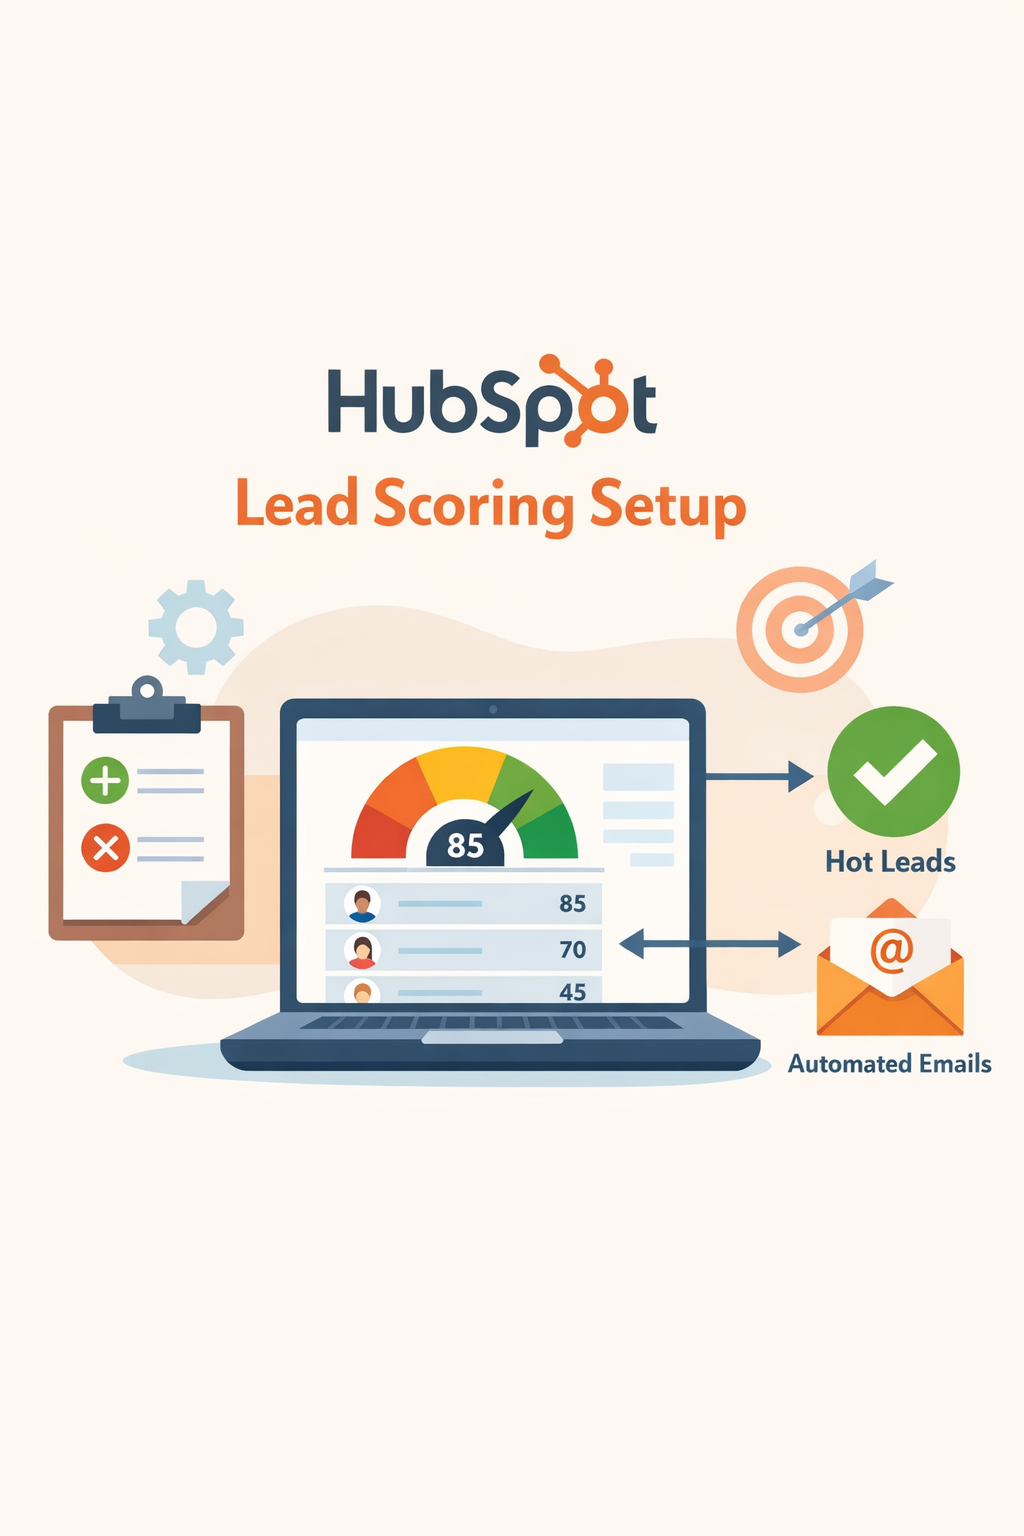
Lead scoring is a system that assigns a numerical value to each contact in your CRM based on how closely they match your ideal customer profile and how actively they're engaging with your business.
The score is built from two types of data:
- Fit data (demographic/firmographic): job title, company size, industry, location, revenue
- Behavior data (engagement): page views, email opens, form submissions, demo requests
A contact who's a VP of Operations at a 40-person US company that's visited your pricing page three times this week should look very different in your CRM than a student from another country who downloaded one ebook. Lead scoring makes that difference visible at a glance.
The goal is simple: give your sales team a prioritized list so they're spending their hours on the contacts most likely to close.
Does HubSpot Do Lead Scoring?
Yes. HubSpot includes lead scoring natively, but the version available to you depends on your subscription tier. The starter plan has none, while the professional includes manual scoring, and enterprise adds predictive scoring.
Here's what each tier gets you:
| HubSpot Plan | Lead Scoring Type | Available In |
| Starter | None | — |
| Professional | Manual scoring | Marketing Hub, Sales Hub |
| Enterprise | Manual + Predictive scoring | Marketing Hub, Sales Hub |
- Manual scoring means you define the rules and assign the points yourself.
- Predictive scoring uses HubSpot's machine learning to analyze patterns in your closed-won contacts and automatically score new leads against those patterns
How Does HubSpot Predictive Lead Scoring Work?
Instead of manually defining rules, HubSpot's machine learning analyzes your existing contact database — specifically the properties and behaviors of contacts who converted to customers — and builds a statistical model. It then scores new contacts based on how similar they are to your historical buyers.
Predictive scoring works well when:
- You have 200+ closed-won contacts in HubSpot with consistent data
- Your CRM data is clean and regularly updated
- You've been using HubSpot for 12+ months with reliable tracking
When it doesn't work well:
- Your HubSpot data is inconsistent or incomplete
- You have fewer than 100–150 contacts with lifecycle stage = "Customer"
- Your buyer profile has changed significantly in the last year
For most SMBs, manual scoring with well-defined criteria will outperform predictive scoring — simply because the data set isn't large enough to train a reliable model yet.

The Two Types of HubSpot Lead Scores You Should Be Running
Most HubSpot setups use a single score. High-performing teams use two.
1. The Fit Score (Who They Are)
This score only measures demographic and firmographic data — things that don't change based on behavior. It tells you if this person could be a customer. Use properties like: job title, company size, industry, geography, revenue range.
2. The Engagement Score (What They're Doing)
This score only measures behavioral signals — things that change as a contact interacts with your brand. It tells you if this person is ready right now.
Use properties like: page views, email engagement, form submissions, live chat conversations.
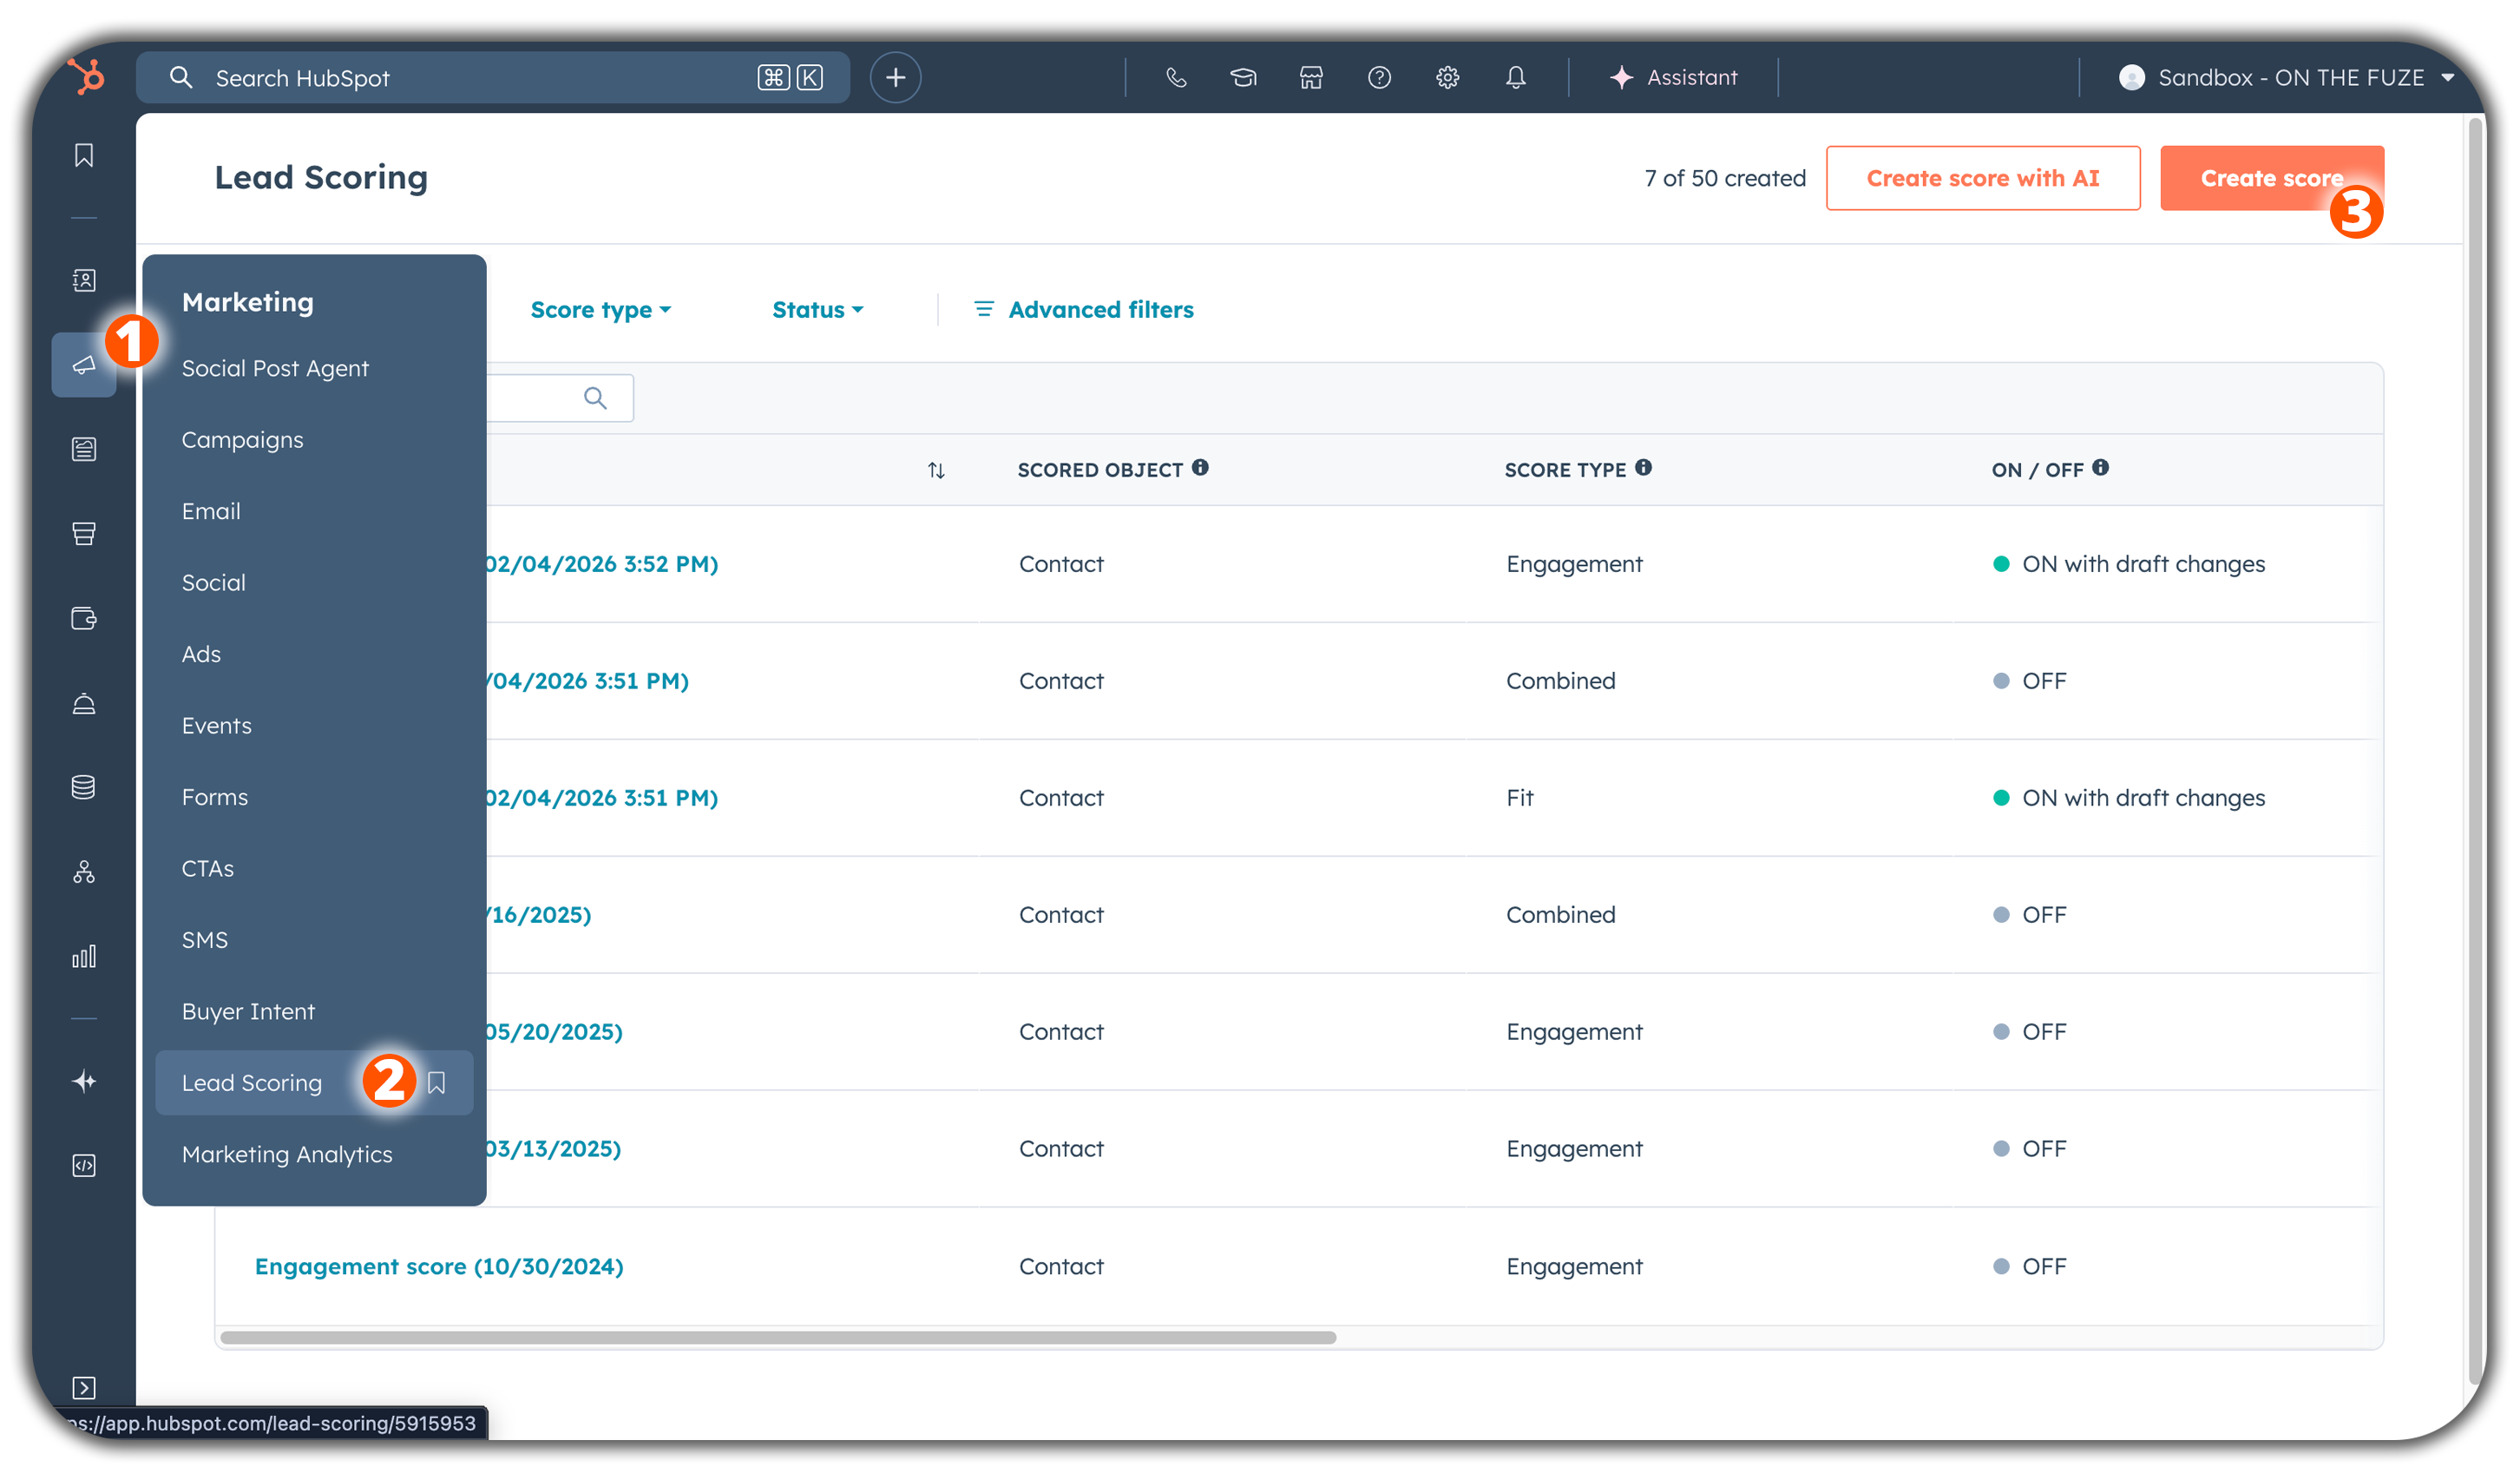
Why split them? In HubSpot Professional and Enterprise, you can build separate Fit and Engagement scores natively. Navigate to Marketing > Lead Scoring and click Create score. From there, you can choose to build an isolated Fit Score or an Engagement Score using the new builder wizard, rather than relying on a single combined number.
How Do You Do Lead Scoring in HubSpot?
Setting up lead scoring in HubSpot can take a couple hours if you have your ICP defined. Here's the process.
Step 1: Define Your Ideal Customer Profile Before You Touch HubSpot
Don't open HubSpot yet. First, answer these questions with your sales and marketing team:
- What job titles have signed your last 10 contracts?
- What company sizes and industries are your best customers in?
- What actions did they take before requesting a demo or reaching out?
- What signals — looking back — indicated they were serious buyers?
Write this down. This is your scoring blueprint. Without it, you're just guessing at numbers.
Step 2: Access the Lead Scoring Tool in HubSpot
- In your HubSpot portal, navigate to Marketing > Lead Scoring.
- Click Create score in the top right.
- Choose your object (select Contacts).
- Select the Combined Score model (this allows you to score based on both who they are and what they do).
 Note: You need to be a Super Admin or have the appropriate permissions to edit scoring properties.
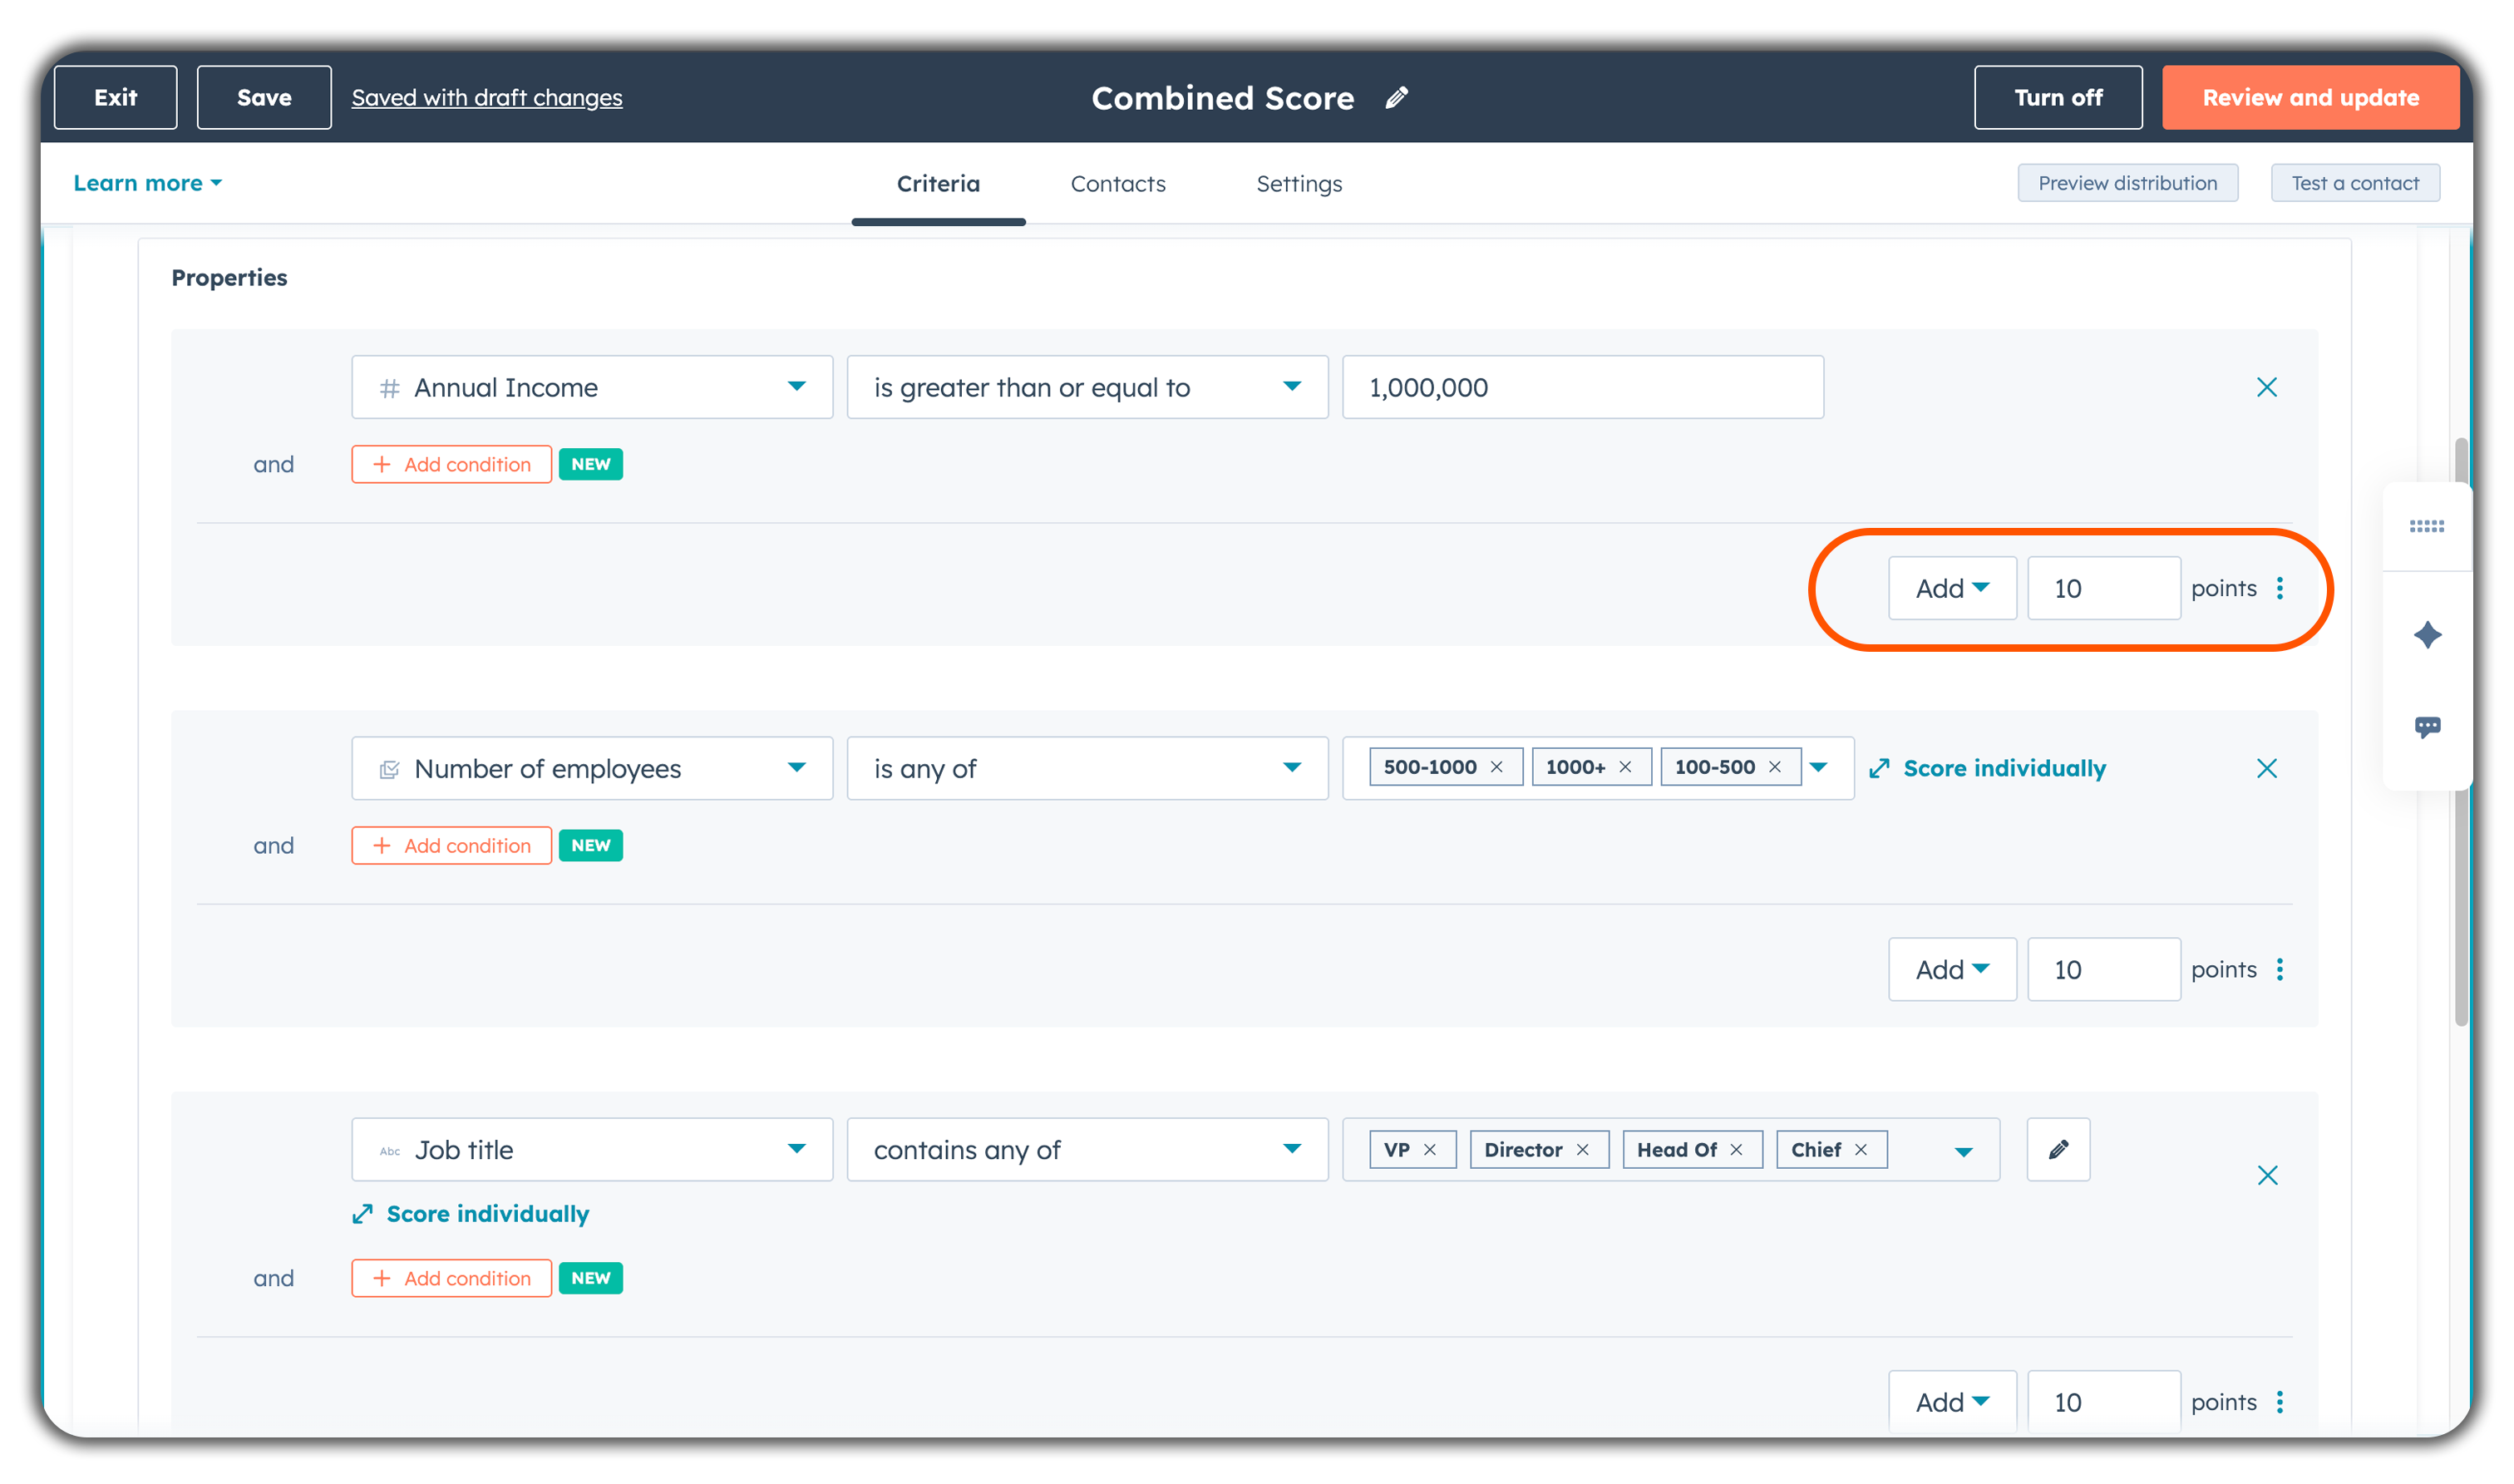
Step 3: Build Your "Fit" and "Engagement" Score Groups (Positive Criteria)
Instead of a single list, HubSpot now uses groups to organize your criteria. Set your overall Score Limit to 100 to prevent highly active but unqualified leads from skewing your data.
Create a "Fit" (Demographic) Group:
- Click the orange + Add property group button.
- Job title contains "VP," "Director," or "Owner" → +10 points
- Company size is between 11–200 employees → +10 points
- Industry is in [your target list] → +8 points
- Country is "United States" or "Canada" → +5 points
- Annual revenue is greater than $1M → +10 points
Create an "Engagement" (Behavioral) Group:
- Has visited the Pricing page → +15 points
- Has submitted a demo request form → +20 points
- Has opened 3 or more marketing emails → +5 points
- Has visited the website 5 or more times → +10 points
- Has watched a product video → +8 points
Start conservatively. You can always adjust weights after running the system for 30–60 days.
Step 4: Add Negative Scoring Criteria
Equally important to positive points, these reduce the score to offset noise. You will add these within the groups you created in Step 3 using negative point values.Add to your Property Group:
- Job title contains "Student," "Intern," or "Freelancer" → -10 points
- Company size is fewer than 5 employees → -10 points
- Email domain is a free provider (Gmail, Yahoo, Hotmail) → -5 points
- Country is outside your service area → -10 point
Add to your Event Group:
- Has unsubscribed from marketing emails → -15 point
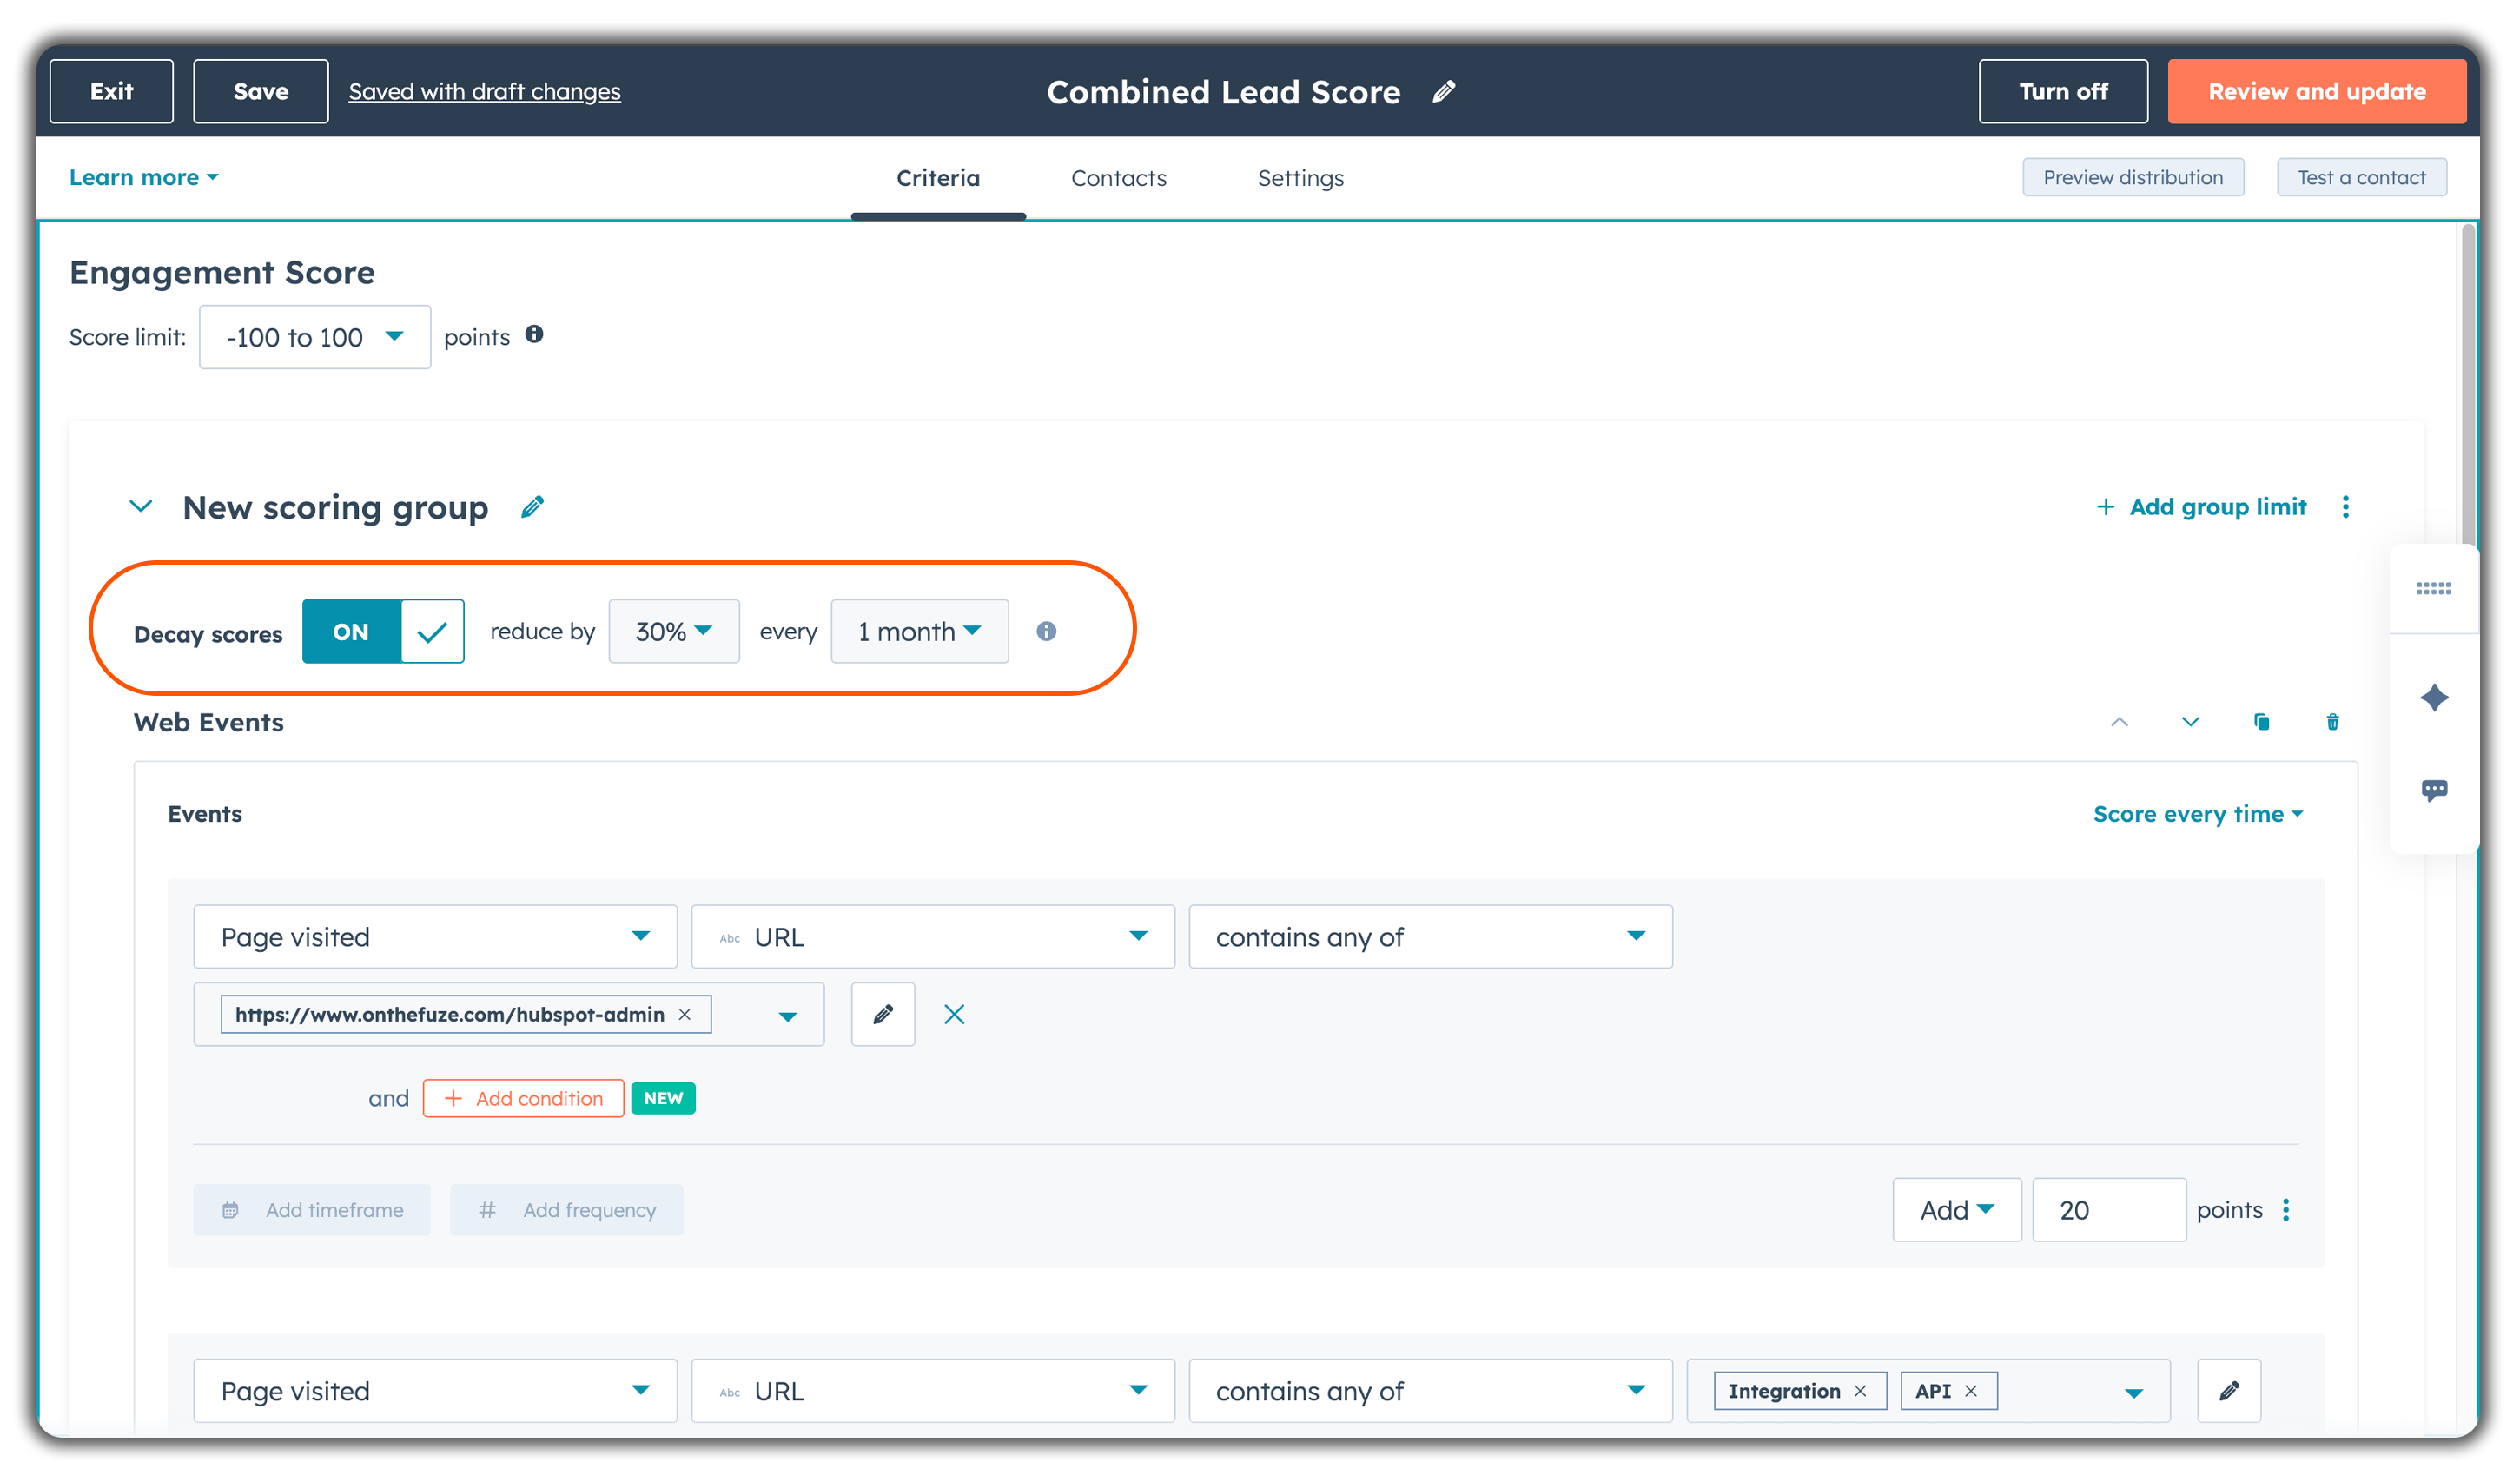
Step 5: Enable Score Decay
To ensure your sales team isn't chasing leads that went cold months ago, enable the decay feature directly on your engagement criteria.
- Stay on the Criteria tab.
- Locate your scoring group.
- Right below the group name, click the toggle to turn Decay scores ON.
- Set your degradation rule using the dropdowns (for example, setting it to reduce by 30% every 1 month).
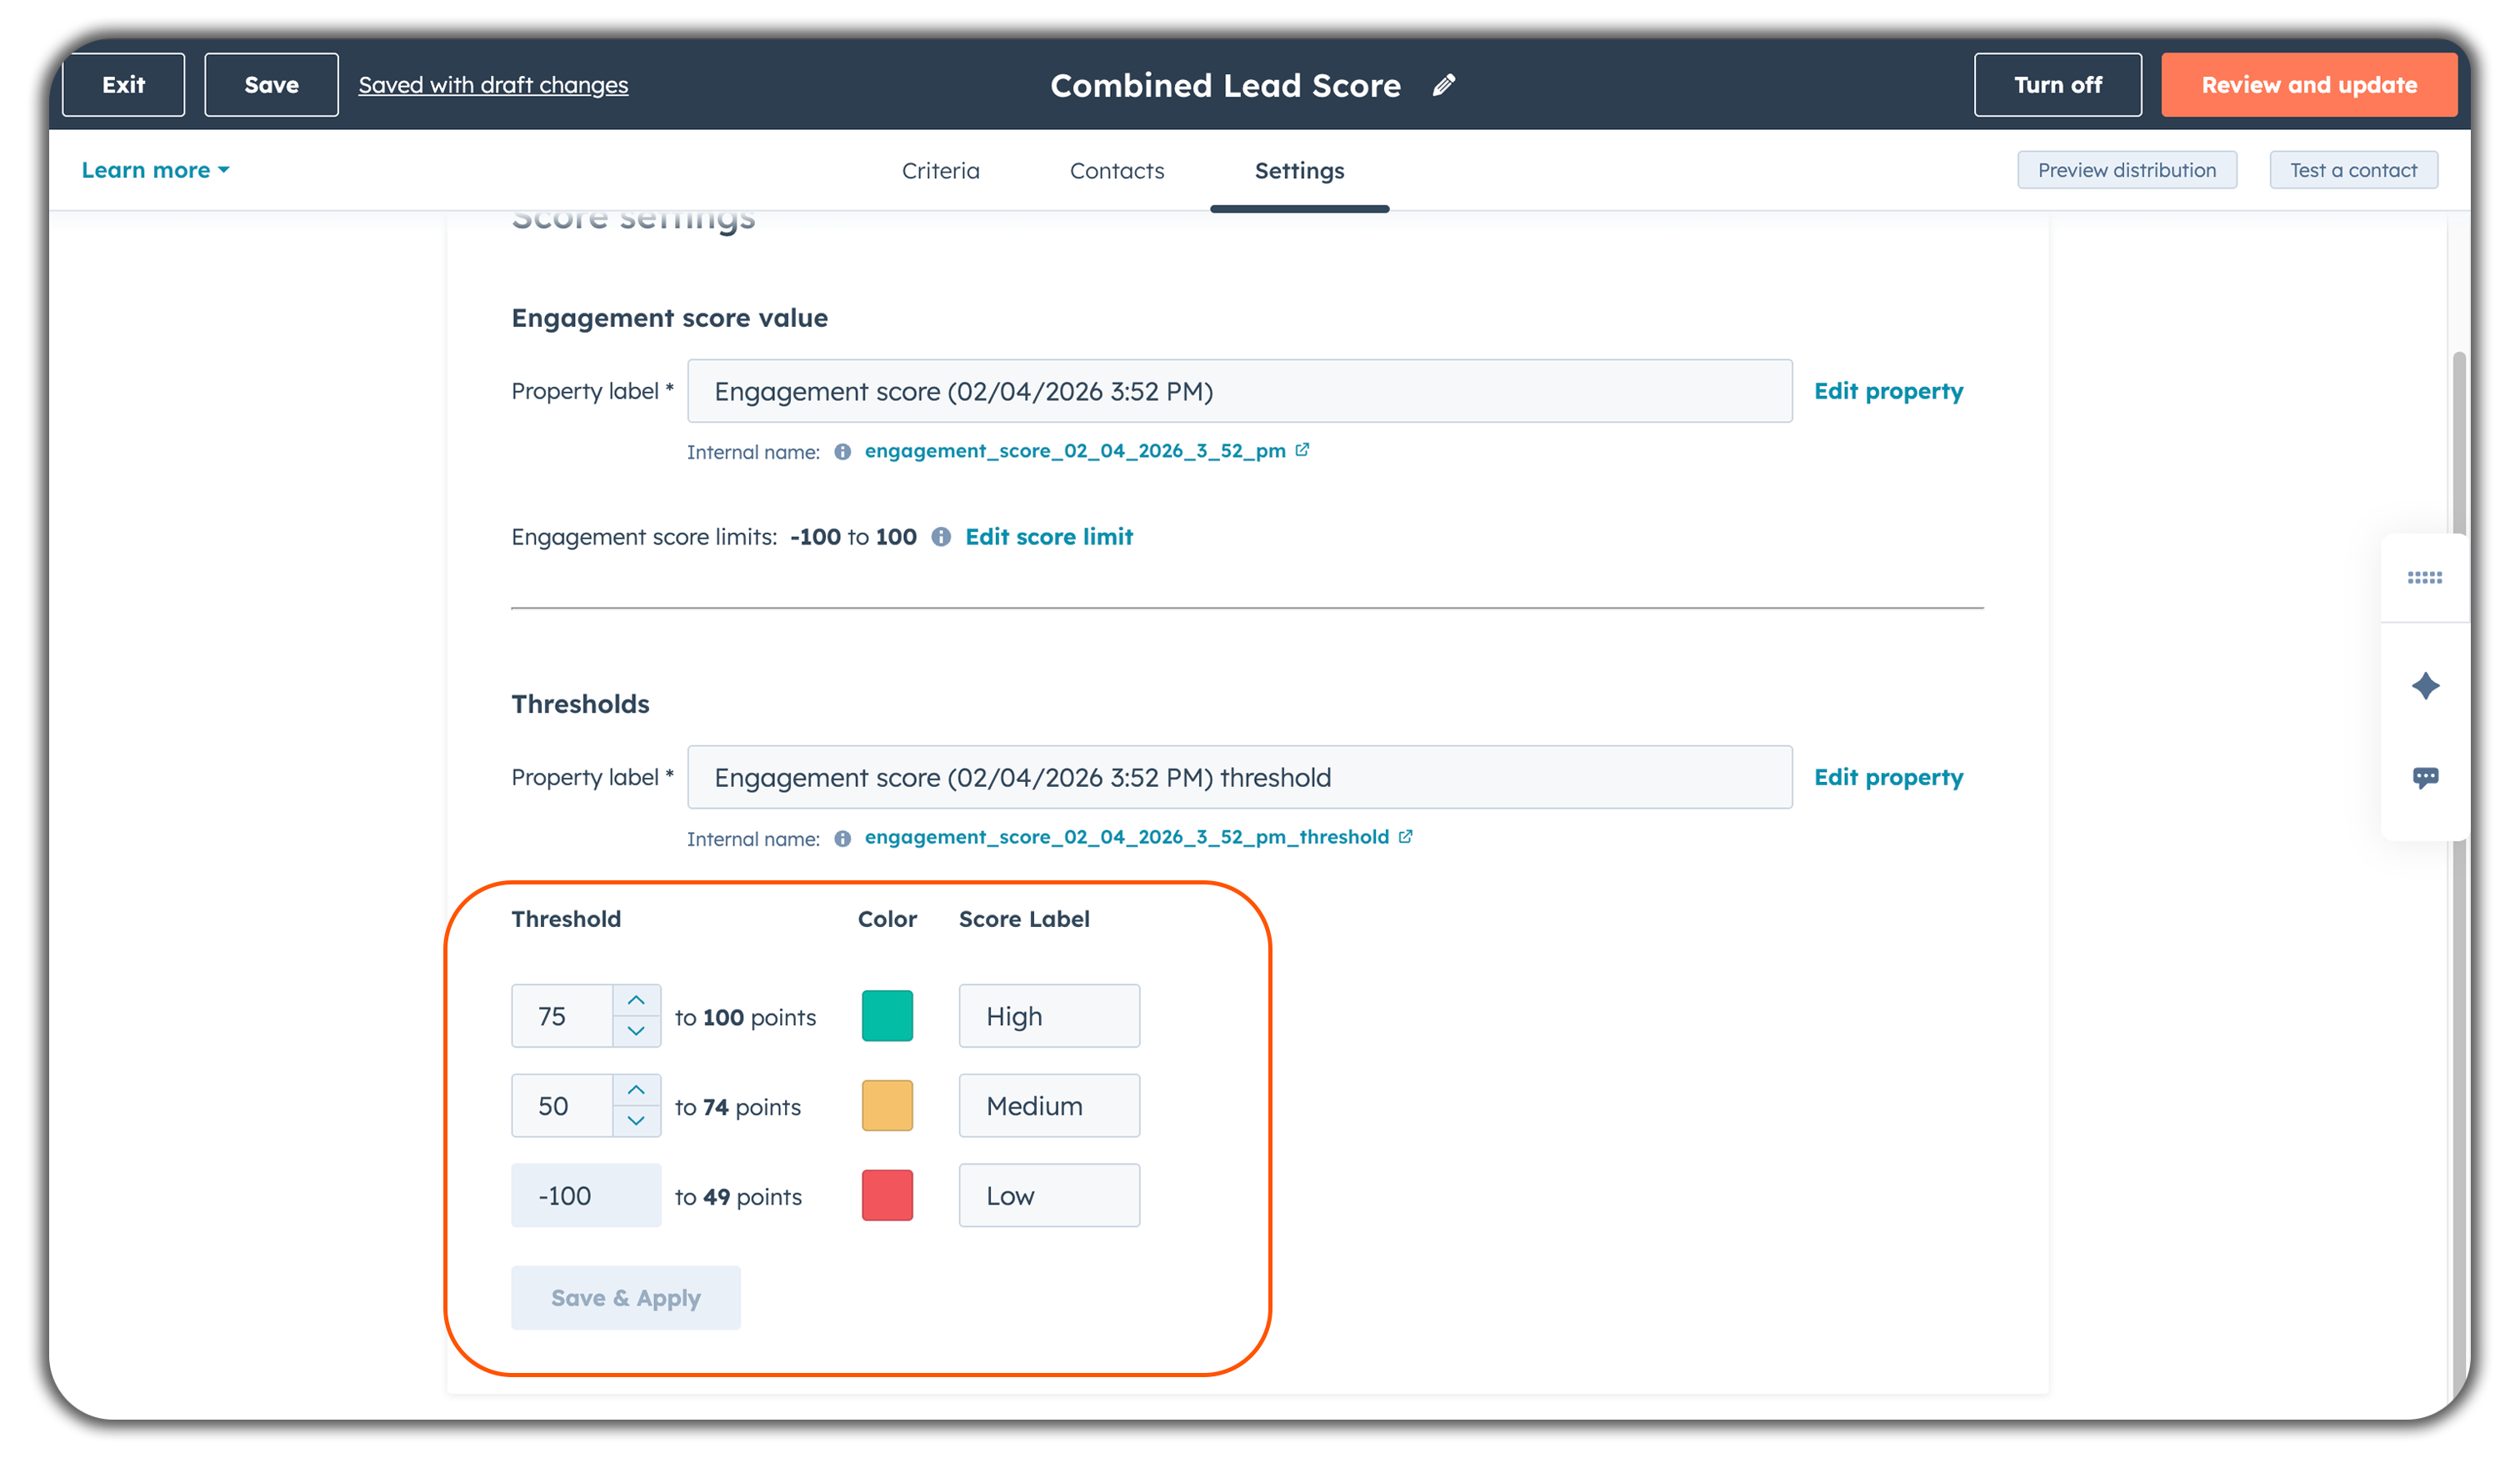
Step 6: Set Score Thresholds for Sales Handoff
Instead of relying purely on workflows to define what a "Hot Lead" is, map your points to labels directly in the scoring tool.
- Still in the Settings tab, click Score thresholds.
- Map out your ranges:
- 0–29 points (Low): Marketing nurture only — too early for sales outreach
- 30–59 points (Medium): Marketing Qualified Lead (MQL) — continue nurturing, monitor
- 60–79 points (High): Sales Qualified Lead (SQL) — sales rep should review and reach out within 48 hours
- 80+ points (Very High/Hot): Hot lead — sales rep should reach out the same day
 Finally, build a HubSpot workflow that automatically notifies the assigned sales rep (or creates a task) when a contact's score threshold label changes to "High" or "Very High."
What Are the Best Signals to Include in HubSpot Lead Scoring?
Here's a prioritized list based on what we consistently see correlating with closed deals at SMBs. Highest-value signals (15–25 points):
- Demo or consultation request form submitted
- Pricing page visited 2+ times
- Responded to a sales email
- Attended a live webinar
Mid-value signals (8–15 points):
- Job title matches ICP criteria
- Company size in target range
- Visited product/service pages
- Downloaded a case study or ROI calculator
- Email opened 3+ times in a sequence
Lower-value signals (3–8 points):
- First form submission (any form)
- Newsletter subscriber
- Visited blog 3+ times
- Social media ad click-through
Negative signals to actively track (-5 to -20 points):
- Free email domain
- Job title indicates non-buyer (intern, student, consultant)
- Company size outside your range
- Unsubscribed from all emails
- Country outside service territory
Advanced Lead Scoring: What Teams Are Building in 2026
If you're on HubSpot Enterprise and your team is technically capable, there are more sophisticated setups worth knowing about.
1. The Orchestration Layer: Qualifying Leads Before They Hit HubSpot
This is the biggest architectural shift on this list. Instead of letting a lead land in HubSpot and then scoring them, you qualify them in transit — before the HubSpot record is even created.
Tools like Default, Clay, and Chili Piper sit between your form submission and your CRM. They receive the lead data, enrich it, evaluate it against your qualification rules, and then push to HubSpot with the lead score and lifecycle stage already set.
Why This Changes the "Speed to Lead" Problem
The traditional HubSpot flow looks like this:
Form submitted → HubSpot contact created → Workflow triggers → Score calculated → Lifecycle stage updated → Sales rep notified → Rep reviews → Rep reaches outThat chain takes minutes at best, hours in practice. By the time a rep is looking at the contact, the prospect has moved on.
The orchestration flow compresses that to milliseconds:
Form submitted → Enrichment fires (in-flight) → Qualification rule evaluated → HubSpot contact created with score + lifecycle already set → Routing decision shown on Thank You page in real timeThe prospect either sees a calendar booking link while they're still on your site — or they get a generic "we'll be in touch" message. That routing decision happens before they close the tab.
The Default Workflow: Step by Step
Here's the exact flow using Default as the orchestration layer:
Step 1 — Capture A lead submits a form on your website. The form data hits Default's webhook endpoint before touching HubSpot.
Step 2 — In-Flight Enrichment Default immediately sends the email address to an enrichment provider (Clearbit or Apollo) via a webhook call. Within ~200ms, it receives back: company name, company size, industry, tech stack, funding stage, and more.
Step 3 — Qualification Logic Default evaluates the enriched data against your defined qualification rules. Example rule:
IF company_size > 500 AND tech_stack CONTAINS "Salesforce" THEN qualified = TRUEYou're not guessing at fit based on what the prospect told you on the form — you're running against verified firmographic data.
Step 4 — Routing
- Qualified contact: The Thank You page dynamically renders a calendar booking link (Calendly or HubSpot Meetings). The prospect books a call in the same session, at peak intent.
- Unqualified contact: The Thank You page shows a standard confirmation. They go into a nurture sequence.
Step 5 — Sync to HubSpot Default pushes the contact to HubSpot with the following already populated:
- A custom number property (e.g.,
orchestration_scoreorexternal_lead_score) set to the calculated value. (Note: Because the legacy "HubSpot Score" was retired, you must map this to a custom property). Lifecycle Stageset to MQL or SQL based on the qualification result- All enriched properties written to the contact record
Your HubSpot workflows take over from there — but they're working with a fully scored, correctly staged contact rather than a blank record waiting for data.
When to Build This
This setup makes sense when:
- You're processing 50+ inbound leads per day and speed-to-lead is measurably affecting close rates
- Your qualification is heavily dependent on firmographic data that prospects don't self-report (company size, tech stack, revenue)
- Your sales team is wasting meaningful time reviewing leads that don't fit before anyone reaches a real buyer
It's overkill for low-volume inbound funnels. If you're getting 10–15 leads a week, native HubSpot scoring with a well-built workflow handles this fine.
2. Scoring In-App Behavior with Custom Behavioral Events (CBE API)
This one is specifically for SaaS companies — or any business with a product that generates meaningful user events.
HubSpot's native tracking works on your marketing site. Page views, form fills, email opens, CTA clicks. It has no visibility into what users do inside your application. That's a significant gap, because in most SaaS products, the strongest buying signals happen in-app — not on a landing page.
- A user inviting a teammate is a strong signal they're building out a team workflow
- A user exporting a report indicates they've gotten enough value to act on data
- A user creating their third project means they're embedded enough to consider upgrading
- A user who's tried to enable a feature that's behind a paywall is showing clear upgrade intent
None of these fire a HubSpot tracking event on their own. You need to send them explicitly via the Custom Behavioral Events (CBE) API.
Requirements: HubSpot Marketing Hub Enterprise or Sales Hub Enterprise. This API is Enterprise-only.
Step 1 – Define the Custom Event in HubSpot
In your HubSpot portal:
- In your HubSpot account, navigate to Data Management > Custom Events.
- In the top right, click Create an event, then select Create custom event.
- Name the event with a clear, consistent naming convention — e.g.,
app_team_invite - Add any relevant properties you want to capture alongside the event — in this case,
invitee_roleandtimestamp
HubSpot will generate an event name in the format pe[portalID]_app_team_invite. You'll use this exact string in your API calls.
Step 2 – Fire the API Call from Your Application Backend
When a user triggers the defined action in your product (in this case, inviting a teammate), your backend fires a POST request to the HubSpot Events API:
Endpoint:
POST https://api.hubapi.com/events/v3/sendHeaders:
Authorization: Bearer YOUR_PRIVATE_APP_TOKEN Content-Type: application/jsonPayload:
json
{ "eventName": "pe12345678_app_team_invite", "email": "user@example.com", "properties": { "invitee_role": "admin", "timestamp": "2025-10-01T12:00:00Z" } }A few things to get right here:
- Use your Private App token, not your API key. HubSpot deprecated API key auth in 2022.
- The
emailfield is how HubSpot matches the event to an existing contact record. If no contact exists with that email, HubSpot creates one. - The
eventNamemust match exactly what you defined in Step 1, including the portal ID prefix. - You can pass additional properties alongside the event — these get written to the contact record and can be used in scoring or segmentation.
Step 3 – Create the Scoring Rule
Back in HubSpot:
- Navigate to Marketing > Lead Scoring and open your Engagement Score (or Combined Score).
- Click the orange + Add event group button.
- Under the event options, select Custom Behavioral Event.
- Choose
app_team_invitefrom the dropdown and assign +20 points.
What This Unlocks: Product-Led Sales
When your scoring model includes in-app behavior, your sales team's outreach changes character. "I saw you're adding people to your account — are you looking to move more of your team onto the platform?" is a better opener than any cold script. That's Product-Led Sales.
3. Velocity Scoring with Custom Code (Operations Hub Professional)
This is the most technically involved setup — but it solves a problem that neither native scoring nor the CBE API can address.
The problem: A contact who views 5 pages over 6 months looks identical in HubSpot to a contact who views 5 pages in 45 minutes. Same page-view count. Same score. Completely different urgency.
The contact doing concentrated research right now is almost certainly in active evaluation mode. They're comparing vendors, building a business case, or preparing a recommendation for a leadership decision. They should be flagged immediately.
HubSpot's native scoring has no concept of time-variance between events. It counts occurrences; it doesn't measure velocity. To calculate velocity, you need programmable automation.
Requirements: HubSpot Operations Hub Professional or Enterprise.
The Architecture: A Custom "Velocity Score" Property
First, create a custom contact property:
- Settings → Properties → Create property
- Property type: Number
- Property name:
velocity_score
Building the Workflow with a Custom Code Action
In HubSpot, create a new Contact-based workflow
- Trigger: "Page view count is greater than or equal to 5" (or set a recurring daily enrollment for all active contacts)
- Add an action: Custom code (Operations Hub Professional only)
- Select Node.js 20.x as the runtime (HubSpot deprecated v18 in late 2025)
- Add
contact.hs_object_idas an input variable
The Node.js Velocity Score Script
This is the full logic for the velocity calculation. Since HubSpot's Events API doesn't return raw page views, this script queries the contact's property history for hs_analytics_last_url to calculate the time between their recent page visits:
The Node.js Velocity Score Script
This is the full logic for the velocity calculation:
javascript
const hubspot = require('@hubspot/api-client'); exports.main = async (event, callback) => { const hubspotClient = new hubspot.Client({ accessToken: process.env.HUBSPOT_ACCESS_TOKEN }); const contactId = event.inputFields['hs_object_id']; try { // Fetch the contact's page view history using propertiesWithHistory const response = await hubspotClient.apiRequest({ method: 'GET', path: `/crm/v3/objects/contacts/${contactId}?propertiesWithHistory=hs_analytics_last_url` }); const body = await response.json(); const urlHistory = body.propertiesWithHistory?.hs_analytics_last_url; if (!urlHistory || urlHistory.length < 5) { // Not enough data yet — write 0 and exit callback({ outputFields: { velocity_score: 0 } }); return; } // Extract timestamps from the history array and convert to milliseconds // Note: HubSpot returns history from newest to oldest const timestamps = urlHistory.slice(0, 5).map(item => new Date(item.timestamp).getTime() ); // Calculate time differences between consecutive page views (in minutes) const timeDiffs = []; for (let i = 0; i < timestamps.length - 1; i++) { const diffMs = timestamps[i] - timestamps[i + 1]; const diffMinutes = Math.abs(diffMs / (1000 * 60)); timeDiffs.push(diffMinutes); } // Calculate average time between page views const avgTimeBetweenViews = timeDiffs.reduce((sum, diff) => sum + diff, 0) / timeDiffs.length; // Calculate variance to detect binge-reading vs. casual browsing const variance = timeDiffs.reduce((sum, diff) => sum + Math.pow(diff - avgTimeBetweenViews, 2), 0) / timeDiffs.length; // Base velocity score: inversely proportional to average time between views let velocityScore = Math.max(0, 100 - avgTimeBetweenViews); // Apply Binge Multiplier: if all 5 views happened within 60 minutes // AND the average time between views is under 15 minutes if (avgTimeBetweenViews < 15 && variance < 50) { velocityScore = velocityScore * 2; // 2x multiplier for concentrated research } // Cap at 100 to keep it within a readable range velocityScore = Math.min(100, Math.round(velocityScore)); callback({ outputFields: { velocity_score: velocityScore } }); } catch (error) { console.error('Velocity score calculation failed:', error); callback({ outputFields: { velocity_score: 0 } }); } };After the custom code action runs, add a Set property value action in the workflow to write velocity_score to the contact's record. From there, you can add a workflow branch to notify sales if the velocity score crosses a specific threshold.
Should You Use HubSpot's Native Scoring or a Third-Party Tool?
For most SMBs, HubSpot's built-in scoring is enough. Here's when to consider a third-party tool:
Stay with HubSpot native scoring if:
- You're on Professional or Enterprise
- Your ICP is well-defined
- You don't need real-time enrichment or complex mathematical formulas
- Your team can review and update the model quarterly
Consider a third-party or orchestration layer if:
- You're processing high inbound volume (100+ leads/day) and speed-to-lead matters
- You need enrichment data (company size, tech stack, funding rounds) to be part of the scoring decision — not just a nice-to-have
- Your sales cycle has distinct buyer personas that require different scoring models
- You're running a SaaS product and PQL signals (in-app behavior) are your best buying indicators
Tools like MadKudu, Breadcrumbs.io, or Default are worth evaluating if you hit those thresholds.
FAQ: HubSpot Lead Scoring
What is lead scoring in a CRM?
Lead scoring is a system that assigns a numerical value to each contact based on how well they fit your ideal customer profile and how actively they're engaging with your brand. The score helps your sales team prioritize which contacts to contact first.
Does HubSpot do lead scoring?
Yes. HubSpot includes manual lead scoring in Marketing Hub Professional and Sales Hub Professional. Enterprise plans add predictive scoring, which uses machine learning to score contacts based on patterns from your historical customers.
How do I access lead scoring in HubSpot?
Navigate to Marketing > Lead Scoring. This is the dedicated workspace where you can view, create, and manage your Fit, Engagement, and Combined scoring models.
How do I edit lead scoring in HubSpot?
Go to Marketing > Lead Scoring and click on the specific score you want to update. You can modify existing point values inside your Property or Event groups, or click + Add property group or + Add event group to introduce new rules. Once you review and turn it on, the updated rules will apply going forward.
What's the difference between fit and engagement scoring?
Fit scoring measures who someone is (job title, company size, industry). Engagement scoring measures what they're doing (page views, email opens, form fills). Running both separately gives your sales team more useful context than a single combined score.
How often should you update your lead scoring model?
Every 90 days is a reasonable starting cadence. Compare your top-scoring contacts against your actual closed-won deals. If they're not correlating, adjust the weights or criteria.
What score threshold should trigger a sales handoff?
There's no universal answer — it depends on your deal volume and sales team capacity. A common starting point: contacts at 60–79 points get a 48-hour follow-up window; contacts at 80+ get same-day outreach.
Can you have multiple lead scores in HubSpot?
Yes, on Professional and Enterprise. Navigate to Marketing > Lead Scoring and click Create score. You can build multiple distinct Fit, Engagement, or Combined scores to suit different product lines, personas, or regions.
What is predictive lead scoring in HubSpot?
Predictive scoring (Enterprise only) uses HubSpot's machine learning to analyze patterns among your existing customers and automatically score new contacts based on similarity. It works best when you have 200+ closed-won contacts with consistent data.
Does HubSpot lead score decay automatically?
Yes! With the new 2026 builder, HubSpot handles this natively. Inside your Lead Scoring criteria (under Marketing > Lead Scoring), you can toggle Decay scores ON within any Event group. This allows you to automatically reduce engagement points over time (e.g., dropping the score by 30% every month) without needing a complex workflow.
Key Takeaways
- Lead scoring assigns a numerical value to contacts based on fit (who they are) and behavior (what they're doing) — so your sales team knows who to call first
- HubSpot includes manual scoring on Professional and predictive scoring on Enterprise — Starter plans don't include it
- Two separate scores outperform one combined score — run a Fit Score and an Engagement Score independently
- Score decay is now automatic — you can toggle decay directly inside your Event groups to reduce points for inactive contacts without needing a workflow.
- Predictive scoring requires scale — a clean database of 200+ customers is the minimum before the model becomes reliable
- Advanced setups use orchestration layers — tools like Default qualify and route leads before they even reach HubSpot
- Review your model every 90 days — compare high-scoring contacts against closed deals and adjust weights accordingly
- Sales team adoption determines ROI — if reps aren't using the score to prioritize their day, the system has no impact